Spread the love

Welcoming a newborn into the family is a moment of profound joy, and crafting a handmade baby blanket remains one of the most cherished traditions in the world of fiber arts. A hand-crocheted baby blanket is far more than a simple nursery accessory; it is a labor of love, a vessel of warmth, and an eventual family heirloom destined to be saved in memory boxes and passed down through generations. Across modern Pinterest boards and high-end nursery lookbooks, elegant handmade blankets have seen a massive surge in popularity, favoring sophisticated color palettes, rich textures, and timeless stitch structures over bright, clashing novelties.

Whether you are preparing a nursery for your own little one, crafting a thoughtful baby shower gift, or stocking a handmade boutique, these 20 elegant crochet baby blanket ideas provide the ultimate balance of beauty, safety, and practicality. Explore these detailed breakdowns, complete with material lists, step-by-step instructions, pro design tips, and creative variations to inspire your next hook and yarn project!

1. The Heirloom Lace Shell Blanket

Brief Introduction

Exquisite, delicate, and deeply traditional, the Heirloom Lace Shell Blanket showcases intricate openwork shell stitches that create a flowing, lightweight drape reminiscent of antique christening gowns.

What This Idea Means

This design relies on classic shell stitch clusters interspersed with airy chain spaces. It provides a lightweight, breathable layer that offers elegance without overheating, making it ideal for warmer months or indoor nursery snuggles.

What Is Needed to Make That Thing

  • Yarn: 4 to 5 skeins of fine fingering-weight bamboo or mercerized cotton yarn in pristine white, cream, or soft ivory.
  • Hook Size: 3.5 mm (E-4) crochet hook.
  • Notions: Tapestry needle for weaving ends and blocking pins.

How to Make It

  1. Foundation Row: Chain a multiple of 6 plus 2 stitches to reach your desired blanket width.
  2. Establishing Shells: Work rows of alternating double crochet shell clusters and chain-space arches, following a rhythmic 2-row repeat pattern.
  3. Growing the Blanket: Continue working the lace shell pattern until the blanket measures roughly 32 by 36 inches, or your desired rectangular size.
  4. Border Trim: Finish the entire outer perimeter with a delicate picot edge or a simple 2-round single crochet border for structural stability.
  5. Blocking: Wet block the finished blanket aggressively on a blocking mat to open up the delicate lace windows and create crisp, clean stitch definition.

Tips and Variations

  • Tip: Always use mercerized cotton or bamboo yarn for lace blankets to give the fabric a subtle, beautiful sheen and structural crispness.
  • Variation: Thread a pale satin ribbon through the border eyelets for a classic vintage christening aesthetic.

2. The Modern Minimalist Moss Stitch Blanket

Brief Introduction

Sleek, minimalist, and ultra-drapey, the Modern Minimalist Moss Stitch Blanket uses the moss stitch (also known as the granite or linen stitch) to create a subtle woven fabric appearance.

What This Idea Means

The moss stitch is renowned for its incredible drape and lack of heavy bulk, making it breathable yet cozy. It creates a sophisticated, modern texture that pairs beautifully with contemporary neutral nurseries.

What Is Needed to Make That Thing

  • Yarn: 4 skeins of DK-weight organic cotton yarn in oatmeal and charcoal.
  • Hook Size: 5.0 mm (H-8) crochet hook.
  • Notions: Tapestry needle.

How to Make It

  1. Foundation Chain: Chain an even number of stitches with oatmeal yarn.
  2. Moss Stitch Setup: Work [single crochet, chain 1, skip 1 stitch] across the row.
  3. Color Interlock: Change colors every 2 rows to form a subtle, elegant horizontal grid line pattern.
  4. Body Extension: Continue working moss stitch rows until the blanket reaches your desired square size.
  5. Border: Finish with a crisp charcoal single crochet border to frame the piece cleanly.

Tips and Variations

  • Tip: Moss stitch works up quickly once you find your rhythm in the chain-1 spaces.
  • Variation: Use variegated yarn for every second stripe to add a subtle watercolor effect against a solid neutral background.

3. The Vintage Pastel Granny Square Blanket

Brief Introduction

A beloved classic reimagined for the modern nursery, the Vintage Pastel Granny Square Blanket combines cheerful, nostalgic square motifs into a cozy, heirloom-quality wrap.

What This Idea Means

This project celebrates traditional square motifs joined seamlessly together, offering endless layout possibilities and serving as an ideal stash-buster for quality yarn scraps in harmonious pastel tones.

What Is Needed to Make That Thing

  • Yarn: Assorted DK baby yarns in 5 harmonious pastel colors (mint, lavender, cream, dusty rose, lemon).
  • Hook Size: 4.0 mm (G-6) crochet hook.
  • Notions: Tapestry needle and blocking pins.

How to Make It

  1. Crafting the Squares: Crochet 36 small granny squares (typically 4 rounds each), ensuring uniform sizing across all colorways.
  2. Blocking: Lightly steam block each square so they lay completely flat and have crisp, even edges.
  3. Layout Arrangement: Arrange the squares in a balanced color grid on a flat surface to plan your visual balance.
  4. Joining: Join the squares using a flat braid join or whip stitch with cream-colored joining yarn.
  5. Border: Finish the entire blanket perimeter with 3 rounds of classic shell stitches.

Tips and Variations

  • Tip: Weave in your yarn tails as you go to make the final assembly process fast and stress-free.
  • Variation: Use solid-colored squares with a contrasting dark neutral joining yarn for a striking, modern stained-glass effect.

4. The Textured Waffle Thermal Blanket

Brief Introduction

Boasting incredible squishiness and depth, the Textured Waffle Thermal Blanket creates a textured grid pattern that traps pockets of warm air while offering a rugged, tailored look.

What This Idea Means

The waffle stitch produces a thick, thermal fabric with a rich 3D texture that looks complex and professional while providing exceptional warmth for cold-weather stroller walks.

What Is Needed to Make That Thing

  • Yarn: 5 skeins of worsted-weight superwash wool or soft acrylic yarn in warm oatmeal or sage green.
  • Hook Size: 5.5 mm (I) crochet hook.
  • Notions: Tapestry needle.

How to Make It

  1. Foundation Multiple: Chain a multiple of 3 plus 2 stitches for your starting width.
  2. Waffle Pattern Setup: Alternate front post double crochets and regular double crochets to establish the grid foundation.
  3. Building the Blanket: Continue working the waffle stitch pattern in rows until the blanket reaches square dimensions.
  4. Border: Finish the outer perimeter with three rounds of simple half double crochet.
  5. Final Weave: Securely weave in all starting and ending tails.

Tips and Variations

  • Tip: Waffle stitch uses more yarn than basic stitches, so ensure you have an extra skein on hand.
  • Variation: Use a rich heathered gray or denim blue yarn for a classic baby boy aesthetic.

5. The Classic Cabled Aran Heirloom Blanket

Brief Introduction

Sophisticated and sculptural, the Classic Cabled Aran Heirloom Blanket showcases intricate braided cable stitches that mimic high-end heritage knitwear.

What This Idea Means

Crochet cables create thick, raised structural braids that offer exceptional warmth, heavy drape, and breathtaking visual elegance, turning a simple blanket into a true family heirloom.

What Is Needed to Make That Thing

  • Yarn: 5 to 6 skeins of premium merino wool or soft acrylic DK yarn in warm cream.
  • Hook Size: 5.0 mm (H-8) crochet hook.
  • Notions: Cable needle (optional) and tapestry needle.

How to Make It

  1. Foundation Row: Chain a width that incorporates your cable panel stitch repeats plus border stitches.
  2. Working Cable Stitches: Use front post treble crochets skipped and crossed over each other to create the raised cable braid effect.
  3. Border Panels: Frame the central cable panels with simple moss stitch or ribbed borders.
  4. Growing the Blanket: Repeat your cable cross rows until the blanket reaches your desired length.
  5. Blocking: Block the finished blanket carefully to make the cable braids pop with crisp definition.

Tips and Variations

  • Tip: Cables are dense and heavy; choose a lightweight yarn like a bamboo-wool blend to keep the blanket comfortable for an infant.
  • Variation: Use a rich heathered oat colorway for a gender-neutral modern heirloom look.

6. The Chevron Ripple Nursery Blanket

Brief Introduction

Dynamic, stylish, and visually striking, the Chevron Ripple Nursery Blanket introduces sharp zig-zag waves in a soothing palette of modern nursery colors.

What This Idea Means

The chevron (or ripple) stitch creates natural peaks and valleys that provide a rhythmic, meditative crochet experience and a stunning geometric result that suits any modern nursery style.

What Is Needed to Make That Thing

  • Yarn: 4 skeins of DK-weight superwash merino wool (1 skein white, 2 skeins slate grey, 2 skeins navy).
  • Hook Size: 4.5 mm (7) crochet hook.
  • Notions: Tapestry needle and tape measure.

How to Make It

  1. Foundation Chain: Chain a multiple of the chevron pattern repeat plus turning chains to reach your desired blanket width.
  2. Establishing the Ripple: Work rows of double crochet, incorporating strategic increases at the peaks and decreases at the valleys to form the zig-zag waves.
  3. Striping Sequence: Change colors every 2 rows to create clean, rhythmic horizontal chevron stripes.
  4. Length Adjustment: Continue repeating rows until the blanket reaches your desired rectangular length.
  5. Border: Add a clean single crochet border along the top and bottom edge to straighten the initial foundation and final row.

Tips and Variations

  • Tip: Count your stitches carefully at the end of every single row—chevron increases and decreases are easy to miscount if distracted!
  • Variation: Use a self-striping gradient yarn cake to let the zig-zags shift colors automatically without cutting yarn tails.

7. The Bobble Polka Dot Baby Blanket

Brief Introduction

Playful, tactile, and charming, the Bobble Polka Dot Baby Blanket features rows of raised textured bobbles that stand out like delightful little polka dots against a smooth background.

What This Idea Means

This design combines structural warmth with delightful tactile play, making it both a cozy nursery layer and a stunning display of crochet skill that babies love to touch.

What Is Needed to Make That Thing

  • Yarn: 4 skeins of anti-pilling acrylic or superwash merino DK yarn in soft cream and dusty blue.
  • Hook Size: 4.0 mm (G-6) crochet hook.
  • Notions: Tapestry needle and scissors.

How to Make It

  1. Base Rows: Work several rows of half double crochet in the background cream color.
  2. Bobble Placement: Incorporate bobble stitches at regular intervals in contrasting dusty blue rows to create raised polka-dot clusters.
  3. Building Height: Alternate plain rows with bobble rows until the blanket reaches desired square dimensions.
  4. Border: Add a sturdy ribbed border around the entire perimeter.
  5. Finishing: Weave in all loose ends securely on the wrong side.

Tips and Variations

  • Tip: Bobble stitches consume extra yarn; make sure you purchase an extra skein to avoid running out midway through the body.
  • Variation: Use multi-colored pastel bobbles for a cheerful confetti effect against a neutral background.

8. The Forest Pine Tree Tapestry Blanket

Brief Introduction

Embrace rustic cabin aesthetics with the Forest Pine Tree Tapestry Blanket, featuring geometric evergreen tree silhouettes worked directly into the fabric.

What This Idea Means

Using tapestry crochet techniques, you carry multiple colors across your rows to create clean, graphic nature motifs that look like traditional knitted heritage wear.

What Is Needed to Make That Thing

  • Yarn: 3 skeins of cream yarn and 2 skeins of deep forest green yarn.
  • Hook Size: 4.5 mm (7) crochet hook.
  • Notions: Tapestry needle.

How to Make It

  1. Chart Reading: Select a geometric pine tree grid chart.
  2. Tapestry Crochet: Work single crochet stitches, carrying the unused yarn color inside your stitches so it remains hidden until needed for color changes.
  3. Blanket Body: Follow your chart across the central rows while maintaining clean edges.
  4. Solid Framing: Frame the forest motifs with a solid forest green ribbed border.
  5. Finishing: Weave in all interior color tails securely.

Tips and Variations

  • Tip: Keep your carried yarn loose enough that the fabric doesn’t pucker or bunch up.
  • Variation: Add mountain peak motifs underneath the pine trees for a complete alpine landscape.

9. The Velvet Chenille Cloud Blanket

Brief Introduction

Ultra-plush, velvety, and exceptionally soft, the Velvet Chenille Cloud Blanket wraps your baby in a cloud-like texture that feels heavenly against the skin.

What This Idea Means

Utilizing jumbo or bulky chenille velvet yarn, this blanket works up remarkably fast and creates a sensory-rich tactile experience that babies adore during naptime.

What Is Needed to Make That Thing

  • Yarn: 4 skeins of super bulky velvet yarn in dusty blue, blush pink, or silver grey.
  • Hook Size: 8.0 mm (L-11) crochet hook.
  • Notions: Tapestry needle and fabric glue for securing ends.

How to Make It

  1. Foundation Chain: Chain loosely to your desired blanket width.
  2. Simple Stitches: Work in basic half double crochet rows—velvet yarn shows off plush beauty best with simple stitches.
  3. Tension Control: Keep your tension even and relaxed to ensure the blanket remains drapey and flexible.
  4. Border Edges: Work a final round of single crochet around the perimeter for a clean frame.
  5. Securing Ends: Tie off and secure chenille yarn tails with a tiny dab of fabric glue to prevent slipping.

Tips and Variations

  • Tip: Chenille yarn hides individual stitches; rely on touch and stitch markers to keep your row counts accurate.
  • Variation: Combine two contrasting velvet colors for a bold, modern striped cloud blanket.

10. The Starburst Mosaic Crochet Blanket

Brief Introduction

Geometric, mesmerizing, and intricate, the Starburst Mosaic Crochet Blanket creates striking optical illusion patterns without requiring complex mid-row color changes.

What This Idea Means

Mosaic crochet uses dropped stitches and single/double crochet combinations to build stunning geometric starbursts that look remarkably advanced while being approachable to learn.

What Is Needed to Make That Thing

  • Yarn: 3 skeins of dark navy yarn and 2 skeins of ice blue yarn.
  • Hook Size: 5.0 mm (H-8) crochet hook.
  • Notions: Tapestry needle.

How to Make It

  1. Mosaic Chart: Follow a geometric mosaic starburst chart, working two rows per color before switching.
  2. Dropped Stitches: Drop working yarn and use front-loop/back-loop mechanics to let colors cascade down into lower rows.
  3. Blanket Body: Continue repeating the mosaic chart until the desired blanket length is achieved.
  4. Envelope Border: Finish with a clean double-thick envelope border to lock in all edge strands.
  5. Blocking: Block flat to ensure the geometric mosaic lines pop cleanly.

Tips and Variations

  • Tip: Mosaic crochet creates a thick, double-sided fabric that is exceptionally warm and cozy.
  • Variation: Use high-contrast charcoal and cream for a dramatic modern graphic look.

11. The Soft Linen Stitch Tweed Blanket

Brief Introduction

Textured, organic, and resembling high-end tweed fabric, the Soft Linen Stitch Tweed Blanket combines earthy speckles of wool for an artisanal aesthetic.

What This Idea Means

The linen stitch combined with tweed yarn creates a woven fabric look that is durable, lightweight, and deeply charming, perfect for everyday nursery use.

What Is Needed to Make That Thing

  • Yarn: 4 skeins of tweed worsted-weight yarn in oatmeal with subtle flecks.
  • Hook Size: 5.5 mm (I) crochet hook.
  • Notions: Tapestry needle.

How to Make It

  1. Foundation: Chain an odd number of stitches.
  2. Linen Stitch: Work [single crochet, chain 1, skip 1] across the row, working into the chain spaces on subsequent rows.
  3. Building Tweed: Let the tweed yarn’s natural multi-color flecks create the pattern organically without changing yarn skeins.
  4. Blanket Square: Continue working linen rows until square.
  5. Border: Add a simple crab-stitch (reverse single crochet) border for a neat, finished edge.

Tips and Variations

  • Tip: Tweed yarn adds built-in texture, meaning simple stitches look exceptionally rich and professional.
  • Variation: Add a solid leather tag labeled “Handmade” to the corner for a boutique finish.

12. The Two-Tone Colorblock Modern Blanket

Brief Introduction

Clean, graphic, and boldly modern, the Two-Tone Colorblock Modern Blanket features broad, balanced bands of muted pastel and neutral tones.

What This Idea Means

Colorblocking creates a dramatic, high-impact visual split that highlights modern design sensibilities and allows you to incorporate multiple favorite nursery shades harmoniously.

What Is Needed to Make That Thing

  • Yarn: 2 skeins each of two contrasting yarn colors (e.g., sage green and cream, or dusty rose and oatmeal).
  • Hook Size: 5.0 mm (H-8) crochet hook.
  • Notions: Tapestry needle and bobbins.

How to Make It

  1. Block One: Start with cream yarn, working 20 rows of half double crochet.
  2. Color Transition: Cleanly cut and join sage green yarn, working 20 rows.
  3. Continuing Blocks: Alternate color blocks until the blanket reaches your desired length.
  4. Border: Finish the entire perimeter with a clean single crochet border to tie the blocks together.
  5. Weaving: Securely weave in all color transition ends.

Tips and Variations

  • Tip: When changing colors, weave your yarn tails along the side edges as you work the border to save time.
  • Variation: Add thin pinstripe separator rows between each major color block for extra definition.

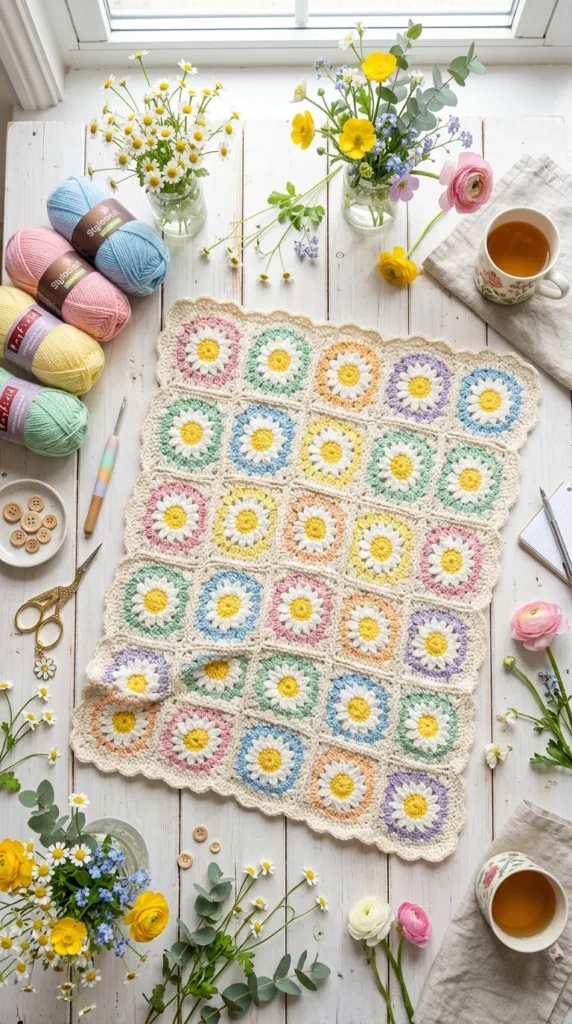
13. The Daisy Granny Square Spring Blanket

Brief Introduction

Fresh, cheerful, and delicate, this design features blooming crochet daisy motifs embedded in granny squares for an enchanting floral nursery frame.

What This Idea Means

It combines the charm of motif-based crochet with a gorgeous, calming color scheme that brings the beauty of an spring meadow right into the crib.

What Is Needed to Make That Thing

  • Yarn: Pastel green, bright white, and sunshine yellow DK yarn.
  • Hook Size: 4.0 mm (G-6) crochet hook.
  • Notions: Tapestry needle.

How to Make It

  1. Daisy Centers: Start each square with a small yellow puff stitch center, surrounded by white petals, before squaring it off with pastel green rounds.
  2. Square Assembly: Create 20 identical floral squares and arrange them to form the blanket structure.
  3. Seaming: Whipstitch squares together with matching yarn.
  4. Border: Add a scalloped shell stitch border around the outer perimeter for a feminine finish.
  5. Blocking: Steam block the joined squares to ensure flat edges.

Tips and Variations

  • Tip: Ensure all your yarn ends are securely woven in before joining squares to keep the interior clean.
  • Variation: Use lavender or buttery yellow as your background square color instead of green.

14. The Neutral Boho Fringe Blanket

Brief Introduction

Flowing fringe details give this blanket a dramatic, bohemian flair that adds texture and warmth to any modern nursery styling.

What This Idea Means

Drawing inspiration from modern bohemian interior design, this blanket incorporates cascading strands of fringe along the borders to create a relaxed, artisan aesthetic.

What Is Needed to Make That Thing

  • Yarn: 5 skeins of heavy worsted yarn in earthy tones (taupe, rust, or oatmeal).
  • Hook Size: 6.0 mm (J-10) crochet hook.
  • Notions: Scissors and a cardboard fringe template.

How to Make It

  1. Base Construction: Crochet a standard blanket using textured moss stitch or half double crochet rows in earthy taupe.
  2. Preparing Fringe: Cut hundreds of equal-length yarn strands using your cardboard template.
  3. Lark’s Head Knots: Attach groups of strands along the top and bottom edges using a crochet hook to create rich fringe.
  4. Trim and Equalize: Trim the fringe neatly with sharp scissors so it hangs in a straight, even line.
  5. Final Press: Lightly steam block the main blanket body.

Tips and Variations

  • Tip: Comb through the fringe with a wire pet slicker brush if you want a brushed-out, feathered bohemian texture.
  • Variation: Use multicolored yarn strands for the fringe to create a playful contrast against a solid neutral base

15. The Deep Space Galaxy Gradient Blanket

Brief Introduction

Mysterious and inspiring, the Deep Space Galaxy Gradient Blanket shifts smoothly from deep midnight black through rich indigo and violet to sparkling starlight white.

What This Idea Means

This blanket acts as a wearable canvas for celestial color theory, utilizing fading yarn cakes to create a seamless cosmic color transition.

What Is Needed to Make That Thing

  • Yarn: One full gradient yarn cake (approx. 1000 yards, DK or worsted weight) in galaxy tones.
  • Hook Size: 4.5 mm (7) crochet hook.
  • Notions: Tapestry needle.

How to Make It

  1. Start at Center: Begin at one end of the gradient cake with midnight black, working in half double crochet rows.
  2. Gradual Shift: Let the yarn naturally transition through indigo and deep violet as you work upward.
  3. Finishing Edge: Complete the final rows with the lightest starlight silver or white section of the gradient.
  4. Border: Add a simple slip-stitch border in matching black yarn.
  5. Weaving Ends: Secure all transition tails along the interior wrong side.

Tips and Variations

  • Tip: Wind your gradient cake carefully to ensure you start from the correct end of the color spectrum.
  • Variation: Sprinkle metallic silver embroidery stars across the dark sections for a true night-sky effect.

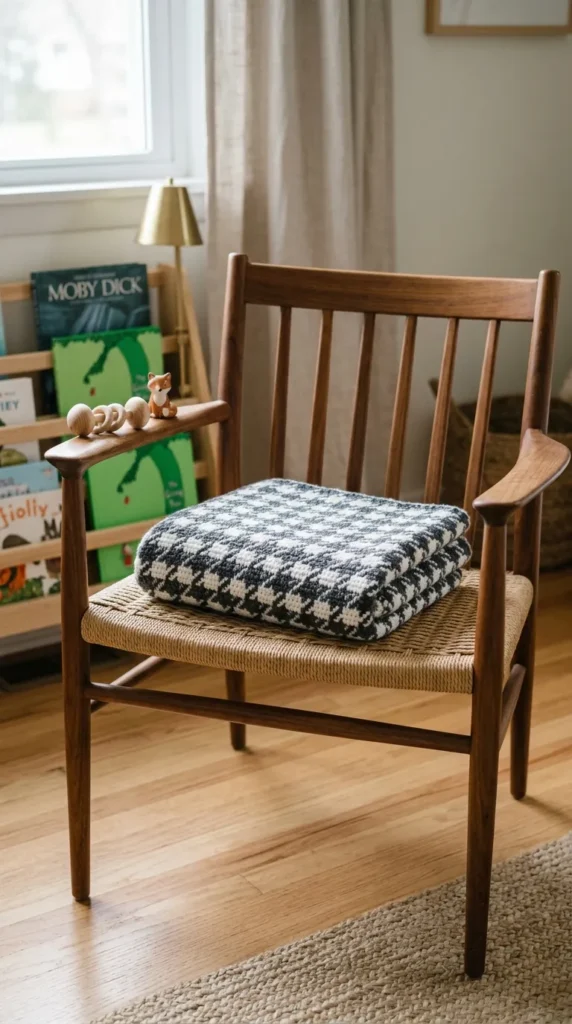
16. The Polished Houndstooth Check Blanket

Brief Introduction

Classic, tailoring-inspired, and impeccably neat, the Polished Houndstooth Check Blanket brings sophisticated menswear patterns into the nursery.

What This Idea Means

Houndstooth colorwork creates a sharp, interlocking two-tone check pattern that looks exceptionally high-end, crisp, and timelessly stylish.

What Is Needed to Make That Thing

  • Yarn: 4 skeins of DK baby yarn (2 skeins charcoal grey, 2 skeins crisp white).
  • Hook Size: 4.0 mm (G-6) crochet hook.
  • Notions: Tapestry needle.

How to Make It

  1. Houndstooth Pattern: Work alternating single crochets and double crochets, dropping and carrying yarns across rows to form the classic jagged houndstooth check.
  2. Maintaining Tension: Keep your carried floats consistent so the pattern remains even across the blanket.
  3. Growing the Check: Continue repeating the 2-row houndstooth sequence until the blanket is square.
  4. Solid Border: Frame the patterned center with three solid rounds of charcoal single crochet.
  5. Blocking: Steam block the blanket to flatten the tailored houndstooth fabric.

Tips and Variations

  • Tip: Houndstooth creates a dense fabric; choose a lightweight yarn so the blanket stays flexible.
  • Variation: Use navy blue and cream for a softer take on traditional houndstooth.

17. The Seaside Coastal Waves Blanket

Brief Introduction

Breezy, tranquil, and reminiscent of seaside shores, the Seaside Coastal Waves Blanket combines oceanic shades of turquoise, navy, sand, and seafoam.

What This Idea Means

This design celebrates calming water-inspired color theory, utilizing soft waves and harmonious coastal hues to create a peaceful nursery atmosphere.

What Is Needed to Make That Thing

  • Yarn: 4 skeins of DK baby yarn in coastal shades (navy, turquoise, sand, white).
  • Hook Size: 4.0 mm (G-6) crochet hook.
  • Notions: Tapestry needle.

How to Make It

  1. Foundation: Chain your desired width using the sand-colored yarn.
  2. Ripple Pattern: Establish a gentle wave pattern using half double crochets with skipped stitches in the valleys and multiple stitches in the peaks.
  3. Color Transition: Cycle through navy, turquoise, and white in block stripes of four rows each.
  4. Border Finish: Work a neat moss-stitch border around the entire perimeter.
  5. Blocking: Steam block gently to relax the ripples into smooth waves.

Tips and Variations

  • Tip: Bamboo-cotton yarn adds a lovely cool drape that mimics the breezy feel of the coast.
  • Variation: Use wider bands of sand-colored neutral yarn between narrow bands of bright blue.

18. The Raised Alpine Mountain Peaks Blanket

Brief Introduction

Rugged and adventurous, the Raised Alpine Mountain Peaks Blanket uses raised post stitches to recreate jagged alpine mountain ranges across the blanket face.

What This Idea Means

This design celebrates outdoor adventure and exploration, using structural relief stitches to give the fabric a tactile, 3D mountain landscape feel.

What Is Needed to Make That Thing

  • Yarn: Worsted-weight yarn in heather grey, snow white, and midnight blue.
  • Hook Size: 5.0 mm (H-8) crochet hook.
  • Notions: Tapestry needle.

How to Make It

  1. Base Rows: Crochet a solid foundation of single crochet in midnight blue.
  2. Mountain Shaping: Use front post double crochets angled together to form triangular mountain peak shapes in white and grey.
  3. Valley Filling: Fill in the background valleys with textured moss stitch rows.
  4. Repeating Ranges: Work two full ranges of mountain peaks across the blanket height.
  5. Border: Frame the entire alpine scene with a clean midnight blue border.

Tips and Variations

  • Tip: Keep your post stitch tension relaxed so the fabric doesn’t curl inward.
  • Variation: Add a snow-capped white tip to each mountain peak for extra detail.

19. The Sweetheart Heart-Motif Baby Blanket

Brief Introduction

Adorable and brimming with love, the Sweetheart Heart-Motif Baby Blanket features sweet openwork hearts integrated into a delicate lace design.

What This Idea Means

This blanket is a wonderful project for welcoming a new baby, combining delicate lace techniques with a comfortable, wearable silhouette for nursery use.

What Is Needed to Make That Thing

  • Yarn: 3 to 4 skeins of fingering-weight cotton yarn in soft pink or ivory.
  • Hook Size: 3.5 mm (E-4) crochet hook.
  • Notions: Tapestry needle and measuring tape.

How to Make It

  1. Foundation: Work a simple starting border using half double crochet stitches.
  2. Heart Lace Pattern: Follow a stitch chart that incorporates skipped stitches and double crochet clusters to form rows of delicate openwork hearts.
  3. Growing the Blanket: Continue repeating the heart motif pattern until the blanket reaches square dimensions.
  4. Hemline Border: Finish with a pretty scalloped border along the outer edges.
  5. Blocking: Block the finished blanket gently with steam to open up the heart stitch windows.

Tips and Variations

  • Tip: Block the finished blanket gently with steam to open up the heart stitch windows and make the motif crisp.
  • Variation: Make the blanket in bold red for holiday celebrations or Valentine’s Day photo shoots.

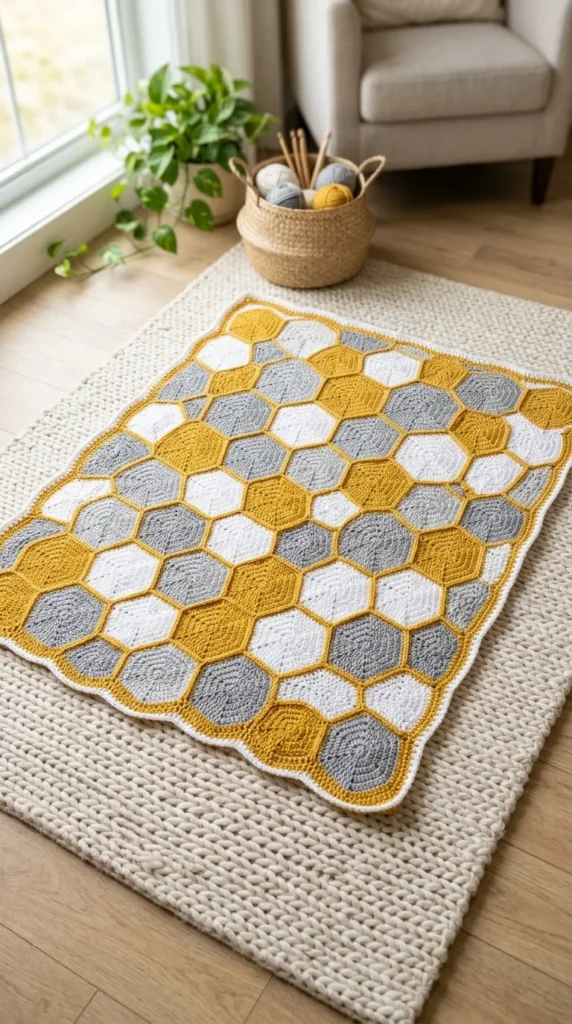
20. The Honeycomb Hexagon Motif Blanket

Brief Introduction

Geometric, modern, and visually striking, the Honeycomb Hexagon Motif Blanket features interlocking hexagonal cells that resemble a natural honeycomb structure.

What This Idea Means

Hexagon motifs offer a refreshing alternative to traditional squares, providing a sophisticated geometric layout that looks stunning in modern nursery interiors.

What Is Needed to Make That Thing

  • Yarn: 4 skeins of DK cotton yarn in mustard yellow, white, and soft grey.
  • Hook Size: 4.0 mm (G-6) crochet hook.
  • Notions: Tapestry needle and blocking pins.

How to Make It

  1. Crafting Hexagons: Crochet 30 solid and patterned hexagon motifs in mustard, white, and grey.
  2. Blocking Hexagons: Steam block each hexagon to ensure sharp, even 6-sided geometry.
  3. Layout Arrangement: Arrange the hexagons in a honeycomb grid pattern.
  4. Joining: Whipstitch the hexagons together along their edges to form a cohesive fabric sheet.
  5. Border Trim: Work custom partial hexagons along the outer edges to straighten the top and bottom into a clean rectangle, then finish with a single crochet border.

Tips and Variations

  • Tip: Block your hexagons before joining to make assembly smooth and precise.
  • Variation: Use shades of honey, cream, and rich amber for a warm, organic color palette.

more ideas to come in future addition